Hatching Tips and Chick Care
Your Go-To Guide for Successful Hatching and Happy Chicks!
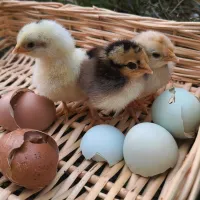
Chick Care
Your chicks brooder needs to have a warm side (heater side) and a cool side. The food and water should be in an easy to reach place from either side, in the middle.
Chicks need to be fed a starter grower crumble feed for the first 17-18 weeks of life.
The warm side of the brooder should be 95 degrees in the first week of life, then decreased by 5 degrees each week thereafter. (A thermometer is necessary)
It is safe to take your chicks outside when the "low" temperature outside matches the appropriate temperature for their age, and once they have had access to chick grit so that they can digest the grass and leaves they will eat. (Be wary of predators)
There are alot of different "bedding" or "litter" options to choose from for your chicks but my favorites are fresh or dry grass clippings (unsprayed), straw, and 8when they are + weeks old scoopable litter such as natural sand. Whatever you use, be sure to keep it clean and mold free to prevent respiratory issues.
Pro tip: after 2 weeks of age carefully place two bricks in the brooder to make a square, level, raised surface to place your waterer on. This helps a ton for keeping derbis out of the water.
Once you get the hang of it caring for chicks is easy! The 3 main things to focus on for good health are a clean environment, correct temperature, and fresh food and water.
If you have any questions or issues message me and I'll be happy to offer advice.
Hatching Tips
Hatching chicks is an exciting and rewarding experience! Whether you're a first-timer or an experienced hatchery, these simple tips will help ensure your little chicks have the best start in life.
1. Set Up the Incubator: Before you begin putting in the eggs, make sure your incubator is clean and ready. Preheat it for at least 24 hours, and check that the temperature stays around 99.5°F (37.5°C). Humidity is just as important, aiming for around 50% during incubation and increasing it to around 65% during hatching.
2. Place the Eggs: After receiving your eggs gently place them in the incubator, pointy end down. I recommend NOT resting before starting incubation. More details on that later. Make sure there’s enough space between them so they aren’t touching. You want the air to circulate freely around each egg. If you're using an automatic turner, great! If not, you’ll need to turn the eggs at least 3 times a day (morning, afternoon, and evening) to keep the embryos developing properly.
3. Keep Things Steady: It’s super important to maintain stable temperatures and humidity levels. Don’t open the incubator too often—it’s tempting, but let your chicks grow in peace! If you must open it, be quick about it so you don’t lose too much heat or humidity.
4. Lockdown Time: Around Day 18, stop turning the eggs. This is called “lockdown,” and it’s when you increase the humidity to 65%. This helps soften the eggshells so the chicks can hatch more easily. It's also important that the incubator isn't opened during lockdown, as it could jeopardize your entire hatch.
5. Waiting for the Hatch: Now comes the fun part—waiting! On Day 21, the chicks should start hatching. You might hear tiny "cheeping" noises as they begin to break through the shell. Be patient and try not to interfere. They’re working hard to break free!
6. After the Hatch: Once your little chicks have hatched, don’t rush to take them out of the incubator. Give them time to dry off and fluff up—usually about 24 hours. Make sure the incubator stays warm (around 95°F) until they’re ready to move to their new home.
Resting Eggs Before Incubation?
Resting eggs.. so many people swear by it but my controversial opinion is that all it does is prolong incubation lowering development and hatch rates.
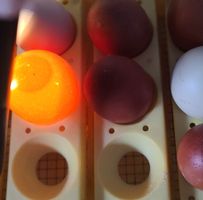
The reason resting eggs is suggested by some is because its believed that it can get the air cells back to their correct position or reattach detached air cells.
If you don't check your air cells then there may not even be a reason to consider resting them in the first place, sometimes shipped eggs arrive with the air cells in place and there is no need to rest, they can go straight in the incubator.
In summer months I highly recommend putting them in the incubator as soon as you receive them. Especially if the temperature where you are is above 80 degrees. Incubation may have begin early at this point and putting them in immediately could save any embryo that has already started.
If you have a turner that holds the eggs upright, pointy side down and you have eggs with detached air cells you can put them in with the turner off (for the first couple days) and the eggs can "rest" while incubation begins. Meaning the air cells will reattach and readjust while they are not moving in that upright position.
If your incubator holds eggs on their side, and you have eggs with detached air cells, then I suggest cutting cartons to fit inside, and putting the eggs in for 2 days upright in the cartons rather than resting on your counter.
I have used this method on shipped eggs (most of the eggs ive received had detached air cells) and they all reattached this way.
Each fertilized egg has a "viability expiration date" after which no development will occur. Viability can expire from 4-21 days after being laid and is random for each egg, most eggs loose viability sometime after 7 days old. Most of the eggs I ship are 3-6 days old when they are received by my customers. That is IF they haven't been delayed in transit. I am of the opinion that it's better to begin incubation and deal with the air cell at the same time to atleast give them a chance, rather than delaying and potentially causing incubation to never begin.
Everyone has their own methods and perspective that works for them. Each incubator and situation is different so if you've found a method that works for you i recommend sticking to it. Happy Hatching!